IPFS W3Auth Gateway
IPFS Public Gateways(aka. IPFS GW) provide an HTTP-based service that allows IPFS-ignorant browsers and tools to access IPFS content. It's like a bridge connecting Web2 and Web3 world.
Background
IPFS GWs support read-only and writable API calls. However, the original GW configuration only support public(open-to-all) or private(close-to-all) way. If the GW providers want to limit the access only to the requests with authentication, they may need to config a reverse proxy, develop a IPFS plugin or set a cache-layer above IPFS.
Reverse proxy is the most popular way for providers handling authentication. This tutorial configuring private gateway includes a description of controling access with Nginx. Reverse proxy can also keep the original IPFS API calls which makes GW adaptable to all IPFS SDK/toolkits.

Infura provides a Web2-authed GW, which allows user use PROJECT_ID and PROJECT_SECRET after passed the centralized registration service(with email/phone).
However, for the Web3 users, they are more familiar with the web3 identities(with wallet pubkey/privkey). In this article, we will introduce a lightweight Web3-based authentication service based on IPFS gateway and reverse proxy.
Solution
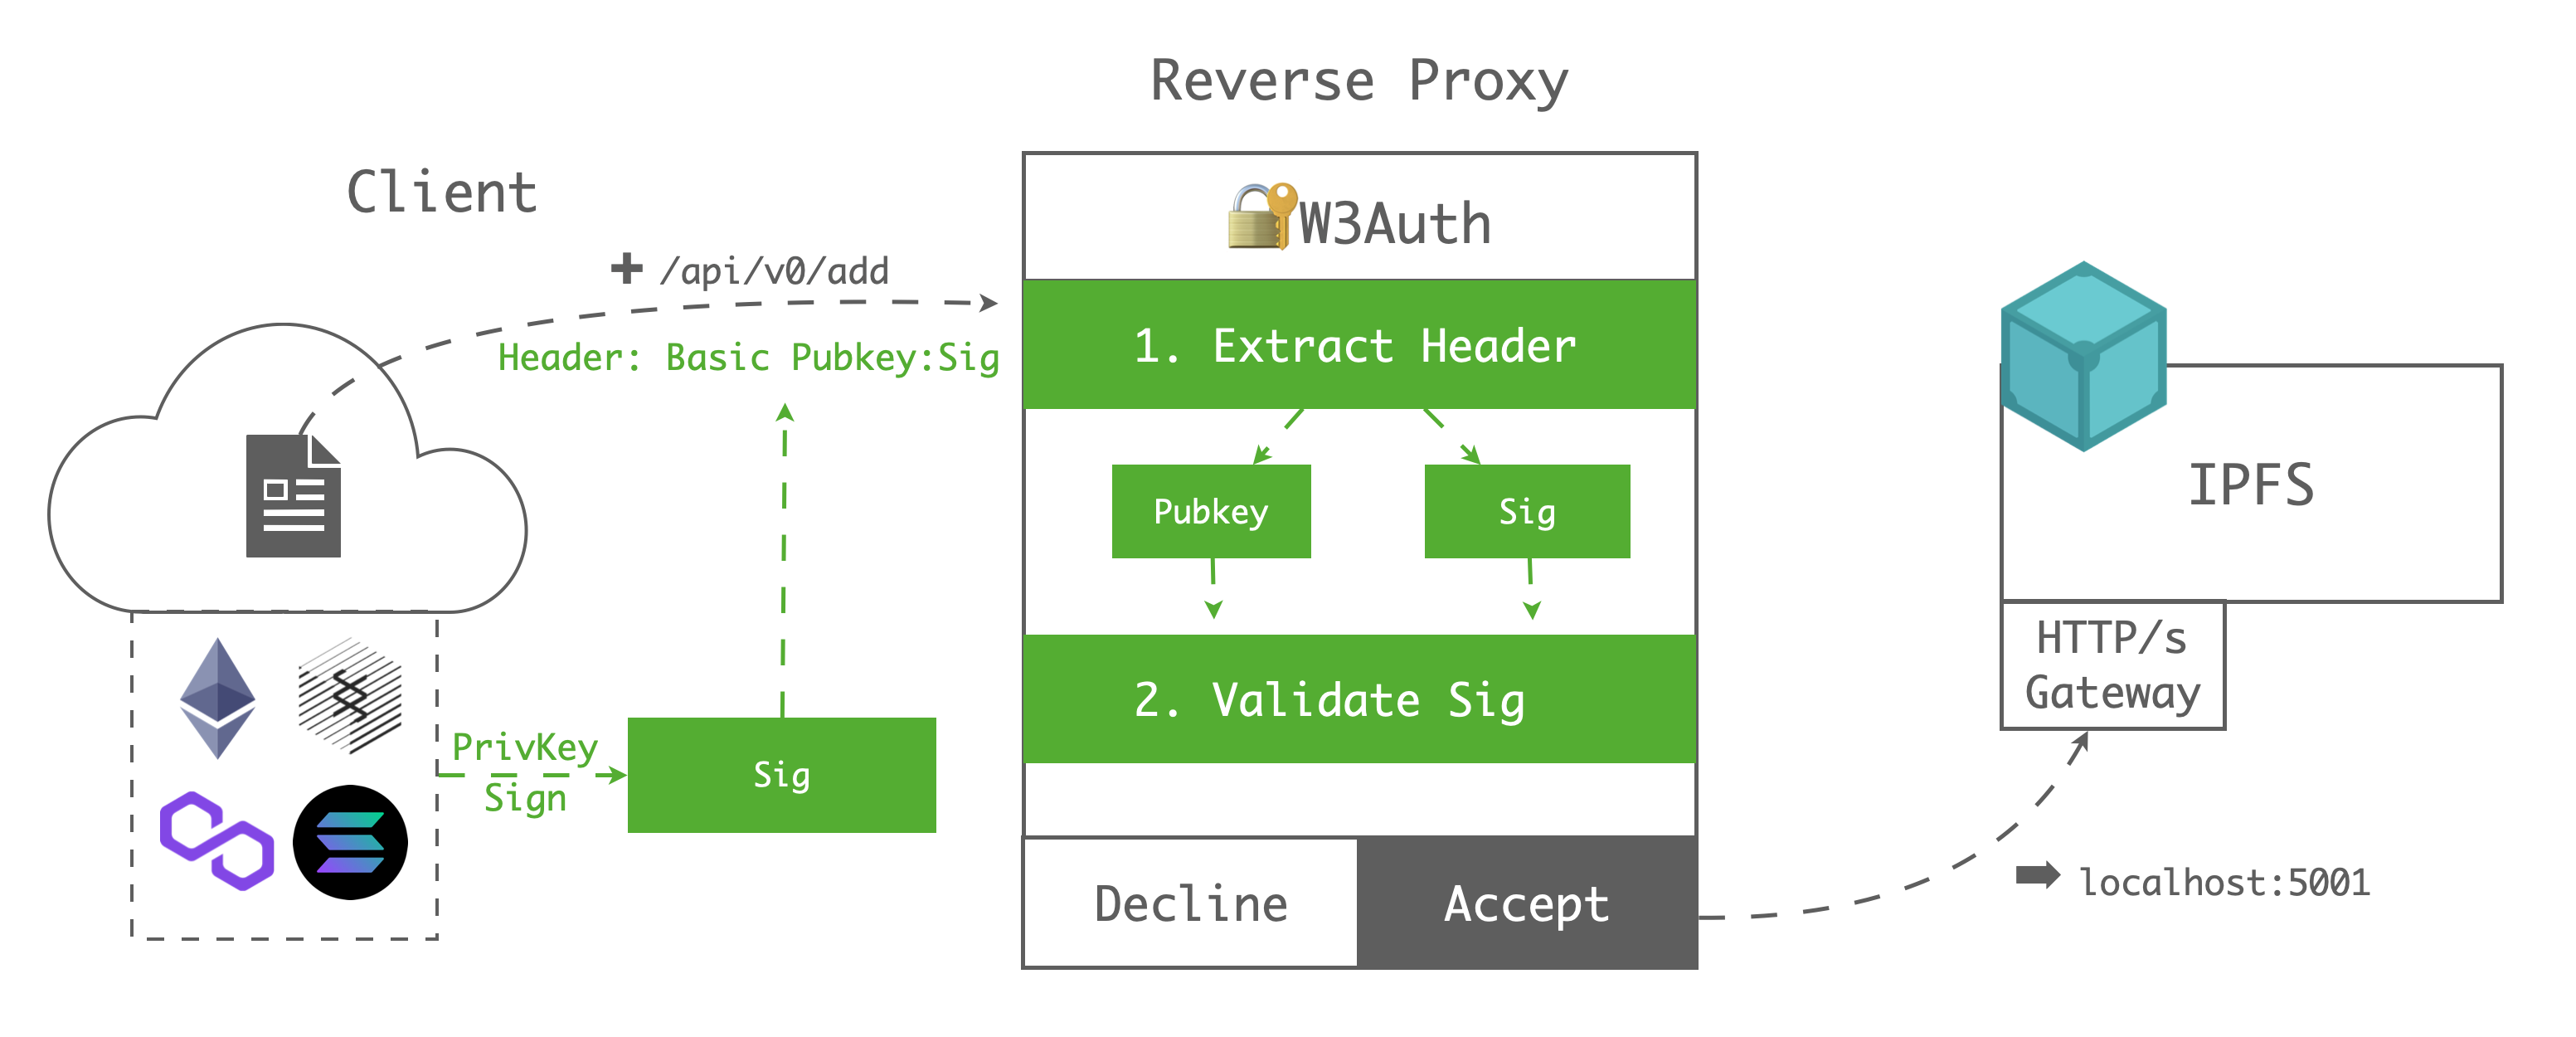
The whole process shows below:

Client-side
Lets say Alice wants to upload her file to IPFS, she only needs to do the following steps:
- Step1. Sign her Pubkey(
0x123) with her private key in any of Web3 wallet(Ethereum/Substrate-based chains/Filecoin/Solana ...), then she will get the Sig(0x456) - Step2. Call original IPFS API(/api/v0/add) with basic auth header(
Basic 0x123:0x456)
Gateway-side
After the Web3 Authenticator received Alice's request:
- Step1. Parse the header, extract Pubkey(
0x123) and Sig(0x456) - Step2. Parse Sig with Pubkey, then get the Msg(
0x123), determine whether the Msg and Pubkey are the same
Deploy
Please make sure you have IPFS Gateway running locally, you can refer to this doc to config the gateway.
1. Run IPFS W3Auth
- Run with docker
docker run -e PORT=5050 -e IPFS_ENDPOINT=http://localhost:5001 --network=host crustio/ipfs-w3auth
- Run with node native
# 1. Clone repo
git clone https://github.com/crustio/ipfs-w3auth-gateway.git
# 2. Install and build
yarn && yarn build
# 3. Run
PORT=5050 IPFS_ENDPOINT=http://localhost:5001 yarn start
- PORT: W3Auth service listening port
- IPFS_ENDPOINT: IPFS local API endpoint
2. Config with reverse proxy
2.1 With caddy
- Auth both readable and writable API
https://ipfs.example.com {
    reverse_proxy 127.0.0.1:5050
}
- Auth only writable API
https://ipfs.example.com {
    reverse_proxy /api/* localhost:5050 {
        header_down Access-Control-Allow-Origin *
        header_down Access-Control-Allow-Methods "POST"
        header_down Access-Control-Allow-Headers *
    }

    reverse_proxy /ipfs/* localhost:8080
}
2.2 With nginx
- Auth both readable and writable API
server {
    listen       80;
    listen  [::]:80;
    server_name  ipfs.example.com;


    error_page   500 502 503 504  /50x.html;
    location = /50x.html {
        root   /usr/share/nginx/html;
    }


    location / {
        proxy_http_version 1.1;
        proxy_pass   http://localhost:5050/;
        proxy_set_header Host               $http_host;
        proxy_set_header X-Real-IP          $remote_addr;
        proxy_set_header X-Forwarded-For    $proxy_add_x_forwarded_for;
        add_header Cache-Control no-cache;
    }
}
- Auth only writable API
server {
    listen       80;
    listen  [::]:80;
    server_name  ipfs.example.com;
    error_page   500 502 503 504  /50x.html;
    location = /50x.html {
        root   /usr/share/nginx/html;
    }
    location /api {
        proxy_http_version 1.1;
        proxy_pass   http://localhost:5050/api;
        proxy_set_header Host               $http_host;
        proxy_set_header X-Real-IP          $remote_addr;
        proxy_set_header X-Forwarded-For    $proxy_add_x_forwarded_for;
        add_header Cache-Control no-cache;
    }

    location / {
        proxy_http_version 1.1;
        proxy_pass   http://localhost:8080;
        proxy_set_header Host               $http_host;
        proxy_set_header X-Real-IP          $remote_addr;
        proxy_set_header X-Forwarded-For    $proxy_add_x_forwarded_for;
        add_header Cache-Control no-cache;
    }
}
Usage
The IPFS W3Auth Gateway is compatible with the official IPFS API, with the same HTTP endpoints, flags and arguments. The only additional step you must take when interacting with the IPFS W3Auth Gateway API is to configure the correct Basic Authentication header.
Authorization: Basic <base64(PubKey:SignedMsg)>
Let's take cURL as an example 😎
curl -X POST -F file=@myfile -u "ChainType-PubKey:SignedMsg" "https://localhost:5050/api/v0/add"
Get ChainType
ChainType now can be:
sub(orsubstrate)eth(orethereum)sol(orsolana)pol(orpolygon)nea(ornear)ava(oravalanche)apt(oraptos)
And you can get PubKey and SignedMsg by using the following web3-ways:
Get Pubkey and SignedMsg
1. With Substrate
Get PubKey
PubKey is just the substrate address, like 5Chu5r5GA41xFgMXLQd6CDjz1ABGEGVGS276xjv93ApY6vD7
All substrate-based chains are adapted:
Get SignedMsg
Just sign the PubKey with your private key to get the SignedMsg
- With Crust Apps
- With Polkadot Apps
- With Subkey
- With Node SDK
- With Code Sample
2. With Ethereum
Get PubKey
PubKey is just the ethereum address(42-characters) start with 0x
Get SignedMsg
Just sign the PubKey with your eth private key to get the SignedMsg
- With MyEtherWallet
- With MyCrypto
- With Code Sample
3. With Moonriver
Moonriver is fully compatiable with the Ethereum, you can just follow the same steps with the Ethereum.
Get PubKey
PubKey is just the moonriver(ethereum) address(42-characters) start with 0x
Get SignedMsg
Just sign the PubKey with your moonriver private key to get the SignedMsg
- With MyEtherWallet
- With MyCrypto
- With Code Sample
4. With Solana
Get PubKey
PubKey is just the solana address
Get SignedMsg
You can sign the PubKey with your solana private key to get the SignedMsg
- With Solana Signer Sandbox (deploy with IPFS(cid:
QmYXnTQwKkup7yNLXZz2VyBvBj9eJB1knG8V8dnmjNuNnu), source code is here, you can deploy yourself) - With Phantom
5. With Polygon
Get PubKey
PubKey is just the polygon address(42-characters) start with 0x. It's compatiable with the ethereum.
Get SignedMsg
Just sign the PubKey with your polygon private key to get the SignedMsg
- With MyEtherWallet
- With MyCrypto
- With Code Sample
6. With Near
You can sign the PubKey with one of your near private key associated with your account to get the SignedMsg
- With Near Wallet Example (deploy with IPFS(cid:
QmZupCTkUs6fDCAjYPfDqDtx85GekztfDa9u6Y8dsWhsvA), source code is here, you can deploy yourself) - With Near-API-JS Example
- With Code Sample
7. With Avalanche
You can sign the Address without chainID prefix, such as avax1se4e9lvhlfwhcqnzjr0vpswqcnhsy5atn5r0l3, with your X- or P- chain private key associated with your account to get the SignedMsg.
- With Avalanche Wallet
8. With Apots
Get PubKey
PubKey is the aptos's account pubkey, such as 0xaa79510150c3a6753f224ef47a315ea6ae9acd23f4506a866feb25f8995c60c. Please pay attention that it's not the same as the address.
Get SignedMsg
You can sign the PubKey with your aptos private key to get the SignedMsg
- With Martian Wallet
